Have you ever sat down to work on your paper crafts and found yourself in between holding down your paper in the perfect spot and not having your glue anywhere near you? For any crafter it’s important to have your tools ready for work, and readily available.
When I first started creating cards, I wasn’t even aware of half the crafting tools available to me. Some of them are incredibly ingenious and fun to work with, but there are some that have become a staple for my crafting needs. Here is a list of the top 10 paper craft tools you’ll need to make our crafts beautiful.
10. Crafting Tweezers: These are just like regular tweezers, but have a longer handle. Now you may wonder why it is that you need tweezers, but it will become apparently clear when you attempt to handle small items such as beads, or other small embellishments. They are great for positioning items that you may otherwise find difficult to handle with your bare hands.
9. A Crafting Knife: Think of this as a glorified box cutter knife. The main difference is that this tool allows the blade to swivel, allowing you to cut curves. It comes in very handy when you’re cutting shapes by free hand.
8. Cutting Board / Mat: With all the cutting, gluing, and other things you’ll be doing, you’ll need to use a cutting board or mat to protect your work surface. These can come in various sizes depending on your needs. Some of the cool features to look for when purchasing this item are boards that are self-healing. This means that when the board gets cut, it will heal itself so the cut on the board does not become permanent. Another great feature is to have a board with a ruler or grid on it. This can help you with aligning your projects properly.
7. Fine Tip Glue Stick Pen: I know you’re thinking, how important is glue? “Can’t I just get regular all purpose white glue?” The answer is no. If you’re planning on working with paper and using small pieces, using a fine tip glue stick will help keep your project looking neat and clean.
6. Craft Scissors: You need a good pair of sharp scissors that are easy to handle and comfortable to hold. If you’re creating crafts that require cutting, a good pair will go a long way to making your craft projects fun to make. In addition to this, there is a great deal of patterned craft scissors out on the market now, providing decorative cutting patterns. They can add a great deal of personality to any project.
5. Metal Ruler: I prefer a metal ruler to a plastic one for the simple reason that it does not wear away as you cut along it. It also has the added advantage of the ink not wearing away also.
4. Paper Folder: This is absolutely one of my favourite tools for crafting. It’s ingenious because it creates a clean, neat fold that just looks so polished. One of my pet peeves is to receive a great greeting card, but ruined because the fold has broken the paper, or the fold has not been measured out properly.
3. Hole Punch: For whatever reason, I often find that I want to create holes in my paper craft projects. I need them to loop ribbon through, or use for other embellishments. A great paper hole punch is important to have. They come in various sizes so it’s important to have the sizes that meet your needs.
2. Tape: This may not be considered so much a tool as one of the materials that you would use for your crafts, but I’m listing it as a tool because it’s something that just has an enormous and invaluable use. Finding a good tape adhesive that can hold things in place, but can be gently removed, is a great tool.
1. Paper Cutter: Lastly, who would be a true crafter of paper if you didn’t have a paper cutter? This tool is great because it can cut large items if you’d like, and it can cut a larger quantity at the same time. That means it saves you time, and it saves your hands from having to do a lot of hard work.
Now that you know what you’ll need, go out there and start creating!
Thursday, June 28, 2007
Monday, June 25, 2007
Paper Folder versus A Bone Folder
One of my greatest passions is creating cards. It allows me to create something that is visually artistic, and also gives me the opportunity to express feelings in the written word. It’s the perfect marriage of the two, culminating in the form of a greeting card.
What I’ve found however is that you can create something beautiful, only to have it ruined by an unprofessional fold. To remedy this, you can use a simple tool called a bone folder. It’s called this for the simple reason that it actually is made of bone.
A bone folder tool can cost anywhere from $5.00 to $15.00 approximately, and of course, if you’re opposed to using something created from bone, they also make plastic and Teflon versions.
The bone folder is essentially used to score your desired paper by running it along a ruler line. You can also just manually use your hands to start your fold by rolling one edge over the other. Using the score line as a guide, you can create a crease and sharpen the fold by using your bone folder to run along the fold. By adding slight pressure, you can create a very professional look. I know this can be difficult to visualize, so the good people at www.artbabe.com have itemized the steps and instructions on how to use a bone folder.
A paper folder is a different tool that can give you the same finished look, but from my experience, is much easier to use. It has a board to work with that has a built in ruler to help guide you. It also has a zero point on the ruler that marks the centre. This allows you to easily determine where the centre of your paper is, which is usually the point at which you normally would fold.
Essentially, there is a metal spike that runs along the board. All you need to do is place your paper over top of your board, using the ruler as your guide. Then you would use the wooden tool that comes with the board. It has a groove where the metal spike fits. When you run it along your paper, you create a perfect fold.
Now the cost of a paper folder is markedly increased from the cost of a bone folder at approximately $90.00. But in my view, it’s worth every penny. When you create cards from scratch, having the ease of the paper folder more than pays for itself. It takes away more of the manual aspect of having to hand fold your paper, and using the bone folder to finish the look.
So the big question is, Paper Folder vs. Bone Folder? Your craft needs will determine your decision. In the meantime, just keep creating your wonderful crafts.
Friday, June 22, 2007
Monogrammed Sugar Cubes
Today every bride and groom would like his or her wedding to stand out. They want to make an impressive statement to their guests, and they want to do it by adding personal touches.
This personal touch is simple, but elegant; having something as ordinary as your sugar cubes personalized with your initials. It’s so unexpected that when your guests reach over to sweeten their coffee, they will be charmed. They’ll appreciate the time and care you took into making this wedding truly yours.
 To make, simply purchase boxed sugar cubes from your local grocery store. You can also purchase icing from the grocer in the colours that you want. Make sure it’s the type of icing that hardens when dry. If it’s not, you’ll end up with a pile of sticky sugar cubes that have been stuck together. If you prefer, you can also create your own. Check out, www.cooks.com for some great icing recipes. Then simply use a pastry bag to dispense the icing.
Voila! You’ve just made your sugar cubes a little sweeter.
Thursday, June 21, 2007
Stamp Kissing
As someone who enjoys creating personal cards I find that working with the same stamps can become limiting in the creative process. How many different colours can you stamp something until it just becomes boring?
Well there is a new technique called stamp kissing. It’s ingeniously simple but will definitely add the much needed excitement to your craft projects.
Simply find two stamps: one should be an outline of an object like a heart. Your other stamp should be a pattern, texture, or design. Using 2 different colours, stamp your outline stamp, in this case a heart, into the main ink colour. Set the stamp down with the inked side facing up.
Now take your patterned stamp, and ink it in the other colour you’ve chosen. Take this stamp and place it over top of your original stamp. The two inked sides should be touching. In essence, the stamps are “kissing”.
When you pull them apart, you’ll see that your heart now has a patterned design. Place your stamp on a piece of cardstock and you’ll end up with an intricate designed heart. The heart will be one colour, and the pattern on it will be another.
Wednesday, June 20, 2007
Great Ways To Decorate An Outdoor Wedding Reception
I recently attended a wedding where the ceremony took place in a small one-room church – think Little House on the Prairie – and the reception was held in the backyard of a small farmhouse. A huge white tent was put up, and the natural view of lush greenery, and rolling grassy hills spreading over several acres was quite breathtaking. I had never been to an outdoor wedding before, but what wash ingenious to me was that the reception area was not contained to the tent.

With So much spare space, small and cozy sitting areas were set up around the tent. Some consisted of white washed iron chairs with a small table, elegantly decorated with blushing pink rosebud pillows.
Other spaces had white wicker sofas facing each other to create easy conversational seating.
And other spaces just consisted of lighting. Large candles housed in hurricane vases and tall decorative iron glass encasements lit the grounds beautifully.
Everywhere you looked, people found great places to gather. With the sun shining through the tent walls, children found their gathering place behind the tent creating shadow puppets.
 It’s not everyday that you get to attend an outdoor wedding reception; I’d never been to one until recently, and I was pleasantly surprised. With all the charm of the outdoors, how can you resist? That’s the great thing about using nature for your reception venue.

With So much spare space, small and cozy sitting areas were set up around the tent. Some consisted of white washed iron chairs with a small table, elegantly decorated with blushing pink rosebud pillows.
Other spaces had white wicker sofas facing each other to create easy conversational
 seating.
And other spaces just consisted of lighting. Large candles housed in hurricane vases and tall decorative iron glass encasements lit the grounds beautifully.
Everywhere you looked, people found great places to gather. With the sun shining through the tent walls, children found their gathering place behind the tent creating shadow puppets.
 It’s not everyday that you get to attend an outdoor wedding reception; I’d never been to one until recently, and I was pleasantly surprised. With all the charm of the outdoors, how can you resist? That’s the great thing about using nature for your reception venue.
Tuesday, June 19, 2007
How to Make a Simple Money Card Holder for Weddings, Birthdays, Baptisms, and Showers
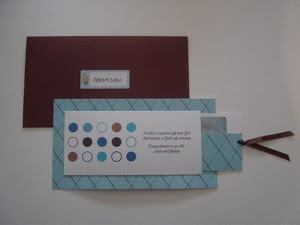
This is a recent card project I made for a christening that I recently attended. The parents are young, hip, stylish, and contemporary. I know this from knowing them, and it was confirmed when I received their invitation. When I originally received it, I knew that I would be creating something that would compliment their style. I also knew that my gift for this occasion would be money, so I designed a card to stylishly hold a monetary gift that would keep it secure. The following is what I created:
 To make this card:
1. Choose a colour scheme. Mine was blue accented with a rich chocolate brown, but feel free to be adventurous. Remember, I chose my colour palette to mimic the style of the original invitation.
2. You can use various software programs to do this, but I suggest using Word, as it’s probably the most common to use. Using the Word program, create a pattern of dots. Simply go to your autoshapes and select the circles. Paste them in your word document in a pattern you like. Keep in mind that your margins may need to be altered, as you will need space for edging.
3. Then using your formatting tool: choose your colours and fill the dots.
4. To the right of your polka dot pattern, insert a text box. Type your message, as you’d like it to appear.
5. Print it out on a colour printer using white cardstock.
6. Cut your design making sure you have extra space to fold in the edges, and that it is centered and large enough to hold the size of a dollar bill. The folds should be made slightly larger than the size of the money.
7. Using the left over white cardstock, cut a piece that is slightly smaller than the length of your polka dot paper. The height should be tall enough to slip into the polka dot paper when folded in half. This is your money holder.
8. Using scrapbook paper with a complimentary design, cover the front of the money holder. Cut a little larger on the sides so you can fold over the back. Secure with glue.
9. Hole punch the money holder on the right hand side in the center. Using a coordinating ribbon, loop the ribbon and create a knot to secure it.
10. Take your polka dot paper and center it on your scrapbook paper. Choose the size of your border that you’d like. Cut the scrapbook paper to the size you’ve chosen.
11. If you’d like your scrapbook paper to have more weight, you can glue it onto white cardstock. This is completely up to you. Some scrapbook papers are heavy enough.
12. Take your polka dot paper with edges folded in. Add glue to the folded edge making sure to leave the right hand side open. Apply polka dot paper to scrapbook paper.
13. Insert your money holder into the polka dot paper.
Monday, June 18, 2007
Creative ways to create scrapbook art!
Creating framed artwork can be a daunting task, especially if you’ve never taken a paintbrush to a canvas. But just because you aren’t artistically inclined to paint or sketch, does not mean you lack creativity. If you are a scrap booker, then you know it takes a lot of imagination to create a layout design that coordinates papers, ribbons, other embellishments, and photographs to a colour palette. That in and of itself is a work of art. So my suggestion to you is to consider this; while scrapbooks are a great way to showcase your memories, they are also a great way to add art in a room.
Choose a room in your home that needs a little artwork. Children’s rooms are a great place for scrapbook art. Select a few design layouts from the last birthday party, family vacation, or just of your little tike. This can even be a project that you and your child can do together.
When you’ve made your selection, choose a coordinating matte and frame. The mattes and frames should be identical and should coordinate with all the layouts. This will make the scrapbook layouts really stand out. Cluster the group of frames on the wall, and Voila! You have art.
Thursday, June 14, 2007
Filipino Engagement and Wedding Traditions
| | |
WEDDING: Filipino weddings involve a great number of individuals; normally there is a bride and groom and a wedding party. In the Filipino tradition, there is an extension of the wedding party called Sponsors. Sponsors fall into two categories: The Principal Sponsors, and Secondary Sponsors. Principal Sponsors can be couples, or any individual(s) to which the couple deem important in their lives. Usually aunts, uncles, or other close friends of the family are chosen. The couple can choose as many Principal Sponsors as they wish. The role of the Principal Sponsors is to provide official witness to the marriage, and to provide support, guidance, and wisdom to the couple.
The Secondary Sponsors have a more active role in the wedding ceremony than the Principal Sponsors. The couple chooses 4 sets of Secondary Sponsors: The Coin Sponsors, The Veil Sponsors, The Cord Sponsors, and The Candle Sponsors.
The Candle Sponsors are usually the parents of the bride and groom; it doesn't have to be, but most couples choose thier parents as the symbol that they have been the primary guiding force in thier lives. A candle symbolizing the Light of Christ will be lit by both parents.
The Coin Sponsors are two individuals, or a couple that have been chosen by the bride and groom. They will present the coins (a symbol of prosperity and promise that the groom will provide for his bride and family) to the couple. The coins are called an Arras or Arrhae. During the ceremony 13 coins are presented to the groom. He in turn will hand them to his new bride. It's been said that if he were to drop any of the coins while handing them over, he was breaking his promise to provide for his wife and family.

The Cord Sponsors are again two individuals the couple has chosen. Their role in the ceremony is to place the cord (usually made from coins that have been linked and dipped in gold, forming an eight) over the shoulders of the bride and groom. The figure eight has no beginning and no end; it links both circles together. By placing the cord on the couple, it is a symbol that they have become one through marriage.

The Veil Sponsors like the cord sponsors are responsible for placing a veil over the couple. The veil is white and embodies purity. By placing the veil on the couple, the bride and groom are witness to the presence of God. They are unified under God's presence.
Another important aspect that is unique to Filipino weddings is the attire of the groom and groomsmen. Grooms in the Philippines wear what is called a Barong, and is considered to be formal attire. It is made of a very light weight fabric that is transparent and is embellished by intricate designs. The fabric of the barong is made from pina (fibres woven from pineapple leaves), or jusi (Chinese silk). It is a shirt that is meant to be worn untucked over an undershirt, and worn with black dress pants and shoes.
Subscribe to:
Posts (Atom)