Sunday, October 28, 2007

Ice Cube Decor


With winter well on its way, and the season for celebrating here, I couldn’t resist but to post this article with a winter twist.

Decorating, food, and gatherings play such a large part of the holiday season. Everyone takes such great care in creating a home that is inviting.

To add a special touch to your culinary décor, freeze ice cubes with leaves, rosebuds, and cherries – anything that gives colour, and is reminiscent of the season.

You can use these icecubes to to chill drinks, or add them to your drinks. Just be very careful, as foods and flowers may contain chemicals and pesticides.

Imagine what your guests will think when they see that perfect bottle of wine chilling in a bed of “frozen” roses. And by the way, what a great way to add romance to a winter themed wedding, or an intimate New Year’s Eve celebration.

Friday, September 14, 2007

The Revolution

I recently joined the revolution – The Quickutz Revolution that is. It was a long time coming, and I wasn’t even sure if I’d make the leap, but after hearing so much about this product, I thought it would be well worth it to at least investigate.

To be quite honest, I never had any intention of purchasing a die cut system. I didn’t even really know what a die cut system was. In my mind it was somewhat of a glorified punch. Then one day at a local craft store, I saw this machine that resembled a pasta maker. In curiosity I looked at it and saw a huge price tag of $164.99. I walked away not even knowing what it really was. I kept browsing through the store however, and overheard a conversation about The Revolution. Another shopper was asking what system the storeowners liked and why. I didn’t pick up to much other than, the preferred system was the Revolution. Then in some bizarre twist of fate, I ended up talking to the same shopper. As it turns out, we both love paper and I told her that I was an avid card maker. She suggested that I use die cuts to embellish my cards. I told her I wasn’t really interested.

I continued onward in my browsing and found some samples of cards that had been made. I fell in love with them. And the common denominator amongst all of them - they were created using die cuts. Darn it! Wasn’t I the girl that just said that I wasn’t interested?!

When I got home I decided to power on my trusty computer and started to do my research. I looked at a lot of the die cut systems available and found that they really looked childish. Now I know this may not be important to others, but if I’m going to spend some money, I’d like it to look solid, or at the very least, grown up. I finally came across the Revolution – and to my surprise, it was the pasta maker that I had seen earlier. I thought it was still too pricey. I kept researching however and found a store in the GTA that was selling it for about 2/3 of the price I had originally seen. I took this as a sign.

I got in the car a few days after and bought the Revolution. I love it. I purchased a few die cuts to get me started, but I’ve found that if you do your research, you can easily find stores that provide really great deals on the dies. In addition to that, I’ve also found that dealing with the Quickutz Customer Service team was incredibly pleasant.

As someone who was not a believer, the Revolution has definitely changed my mind. It’s a fantastic system that looks sleek and stylish, and offers a great wealth of craft functionality. You can use dies for almost any craft project to add texture, design, and character shapes. I feel like the creativity in me has reached a new limitless boundary. So for anyone who is thinking about joining the Revolution, all I have to say is, do your research, and you will no doubt fall in love with the new Revolution.

Wednesday, September 12, 2007

Unique Engagement Photo

Engagement photos have become a staple in wedding photography. They’re used to add personal touches to bridal showers, and to the wedding itself. It’s a great way to capture some special moments of the bride and groom before their big day, in a casual fun way. Unfortunately, engagement photos have also become very predictable. The “spontaneous” poses have become rehearsed and all the engagement photos I’ve seen now look all the same. To create an engagement photo with a new twist, try this.

Have an engagement photo taken as you normally would. Then collect as many photographs as you can of your family, friends, and of yourselves and the special moments that you’ve shared, old and new. This can be quite a fun project to do. It’s a great excuse to bring along your camera to every occasion and become the designated photographer. The more pictures you have, the better. Once you’ve done that, use the Foto-Mosaik program. This program allows you to choose a photo you want (your engagement photo), and have it rebuilt using smaller photos (these are the pics that you’ve gathered). I guarantee that it will be a showstopper at any wedding. For added effect, have your photo framed and displayed with an engraved caption to read, “Because you are a part of us”. Your guests will have a great time trying to find themselves in your photo. It’s a great way to add a new twist on the engagement photo.

Wednesday, August 22, 2007

Dressing Your Candles

Very few things in this world are both beautiful and functional, but candles are just that. They give us light, they symbolize hope and unity, they provide warmth, create intimacy, and are used during almost every holiday season. For its many uses, it’s no wonder that candles come in so many varied forms. Candles have even become works of art. Just take a look at these.


Most candles however, come pretty plain. So here are a few ideas to dress your candles for any occasion.

1. If you have candles that are thick, by thick I mean their circumference is large, they can easily be dressed by taking some decorative paper and just wrapping it around the candle. Tie a coordinating ribbon around it, finished with a bow for a beautiful finished look.

2. Place your candles in beautiful organza bags. This is perfect for gift giving or wedding bombonniere. They add a simple elegance that is perfect for saying thank you.

3. When you’re using floating candles, take some simple cylinder vases and fill them three quarters of the way with water. Then pick some bright beautiful flower blooms. Using just the blooms, immerse them in the water. Then take a simple floating candle and set it on top. These are absolutely stunning; they can be used as elegant wedding centerpieces, or add some style to a beautiful dinner.

4. If you’re using tea lights, you can easily dress them up by adding messages to the outside of the tin they come in. You can use a label machine to produce these, or you can use decorative paper and handwrite your own messages. These are a great way to personalize table settings.


The possibilities really are endless, but hopefully these ideas will help you to make the best and brightest use of your candles. Enjoy!

Sunday, August 12, 2007

Great Use For Your Extra Paper

I know every paper crafter, scrapbooker, and card maker out there has come across this scenario. You are in a store and have just come across the most fantastic paper; you just have to have it. So on an impulsive whim, a purchase is made, but it’s okay, you tell yourself, because even though you don’t have a specific use for it now, you’re sure that a project will come along that will definitely need it. Well weeks go by, then months, and your beloved paper is still unused.

We’ve all come across this. We have some great paper that just wasn’t right for anything that we’re currently doing. ‚We may also have extra paper which came from a scrapbook block that was purchased some time ago. Whatever the case, you’re stuck with it until you use it, so here is a great way to use it up.

Create some personalized envelopes. These days, card and stationary envelopes are just as pretty as the cards themselves. Use your extra paper to create some pizzazz. After all, the envelope is what you see first, and what a great way to make a first impression and introduction to your card.

Use an accent colour on your card or stationary to coordinate your envelope. On the outside, you can use a plain colour, and use a patterned sheet to line the inside. But don’t get stuck thinking only inside the box, or in this case, the envelope. Don’t forget, if you’ve got all this beautiful patterned paper, why not use the designed side to be on the outside. Then use a plain paper to line the inside. It’s a great way to create some contrast and visual appeal.

Tuesday, August 7, 2007

“A Rose By Any Other Name Would Smell As Sweet”

The process of getting married involves a lot of things; purchasing a wedding gown, gift registries, centerpieces, etc., but what no one ever talks about are the serious things. Things that need to be attended to before your wedding so making a transition into “couplehood” is easier.

First and foremost, while this doesn’t have to happen before your marriage, it should be something that you decide upon as soon as possible. I’m talking about the age old question, “should I change my name, or keep my name?” As a modern bride, several options are open to you.

1. Keeping Your Name: You can choose to keep your name as it is and not worry about changing your identification. The problem with this is that you may also have to carry around a copy of your marriage certificate to prove that you are married. Problems or difficulties may arise when you have children who have a different last name than you.

2. Legally Changing Your Name: If you choose to legally change your name to your husbands, you are giving up your identity legally. Now sit down for this one girls, because I was shocked to find this out. If you decide to legally change your name, the person you are now will cease to exist. A new birth certificate will actually be given to you with your husband’s last name. And of course, if anything should go wrong and the marriage dissolves, you will once again have to go through a legal process to become who you once were.

3. Hyphenating: Some women choose to have both names to identify their married name, and their maiden name. This can sound great at first, but keep in mind that you still need to change all your identification and paperwork, and when your signature is required, you’ll have to sign using both names.

4. Using Your Maiden Name Instead of Your Middle Name: Choosing this option to keep your name is one that is not used quite as often, but it does allow a bride to keep both names. Using your maiden instead of your middle name can provide you the opportunity to keep both your identities.

5. Assuming Your Married Name: This option allows new brides to be able to take on their husband’s name, without legally having to change their own. This still requires that all identification and paperwork be changed, (except your birth certificate), but you do not change who you are legally.

Whatever you decide, make sure that it’s something that you will be comfortable with. Remember, in the words of William Shakespeare, “A rose by any other name would smell as sweet.”

Wednesday, July 25, 2007

Personalize Your Wedding

There are so many ways to make a wedding memorable. You can make it the biggest and most grand wedding anyone has ever seen with a fireworks display and all; you can do something completely unconventional; or you can opt to make your wedding a great one by adding personal touches.

While the sound of grandeur is alluring, it’s probably not in the budget for most couples. Unconventional can be fun, but most couples usually want a mix of both traditional and new. Adding personal touches is a classic way to make your wedding day memorable for everyone. Here are a few ways to add that style and elegance to your big day.

1. Get some personalized ribbon. Never before in my life had I used so much ribbon for one event. I used it to decorate, to wrap bomboniere, to hold flowers; the uses were endless. Why not pick a ribbon to match your colour scheme and have a message printed on it. Your names and the date of your wedding can run continuously on the ribbon. Creative Bag is a great place to get your ribbon if you’re in the Greater Toronto Area.

2. Decorate your aisle runner. There are so many ways to do this, but a simple way to personalize is to add your initials to the runner. You can use fabric paint to paint it on, and make this a project for the bridesmaids. If you don’t want to use traditional fabric runners, don’t be afraid to use paper instead. If you want this professionally done, places such as The Original Runner Company can do it for you.

3. Give your wedding meaning. Choose a charity or two and make a donation to them on behalf of your guests. I’ve always loved children so I chose to make a donation to a local hospital, “The Hospital for Sick Children” for my wedding. My husband chose cancer research and made a donation to “The Canadian Cancer Society.” So many of our guests were touched by the gesture and truly appreciated the gift.

4. After your wedding, make a genuine attempt to hand write a thank you note to your guests. It’s so easy these days to sit yourself in front of the computer and type a generic message, and press print 300 times. Sit down and consider why it was important for you to have these people share your big day. If you listen to your heart, it will tell you exactly what to write. It will warm the hearts of your guests to know that you’ve put into words why they are important to you.

5. Create a family tree. I’m not talking about a regular “blood relative” family tree. I’m talking about the circle of life, your life. The people that you’ve chosen to surround yourself with are your family. Take photos of everyone coming to your wedding. Arrange your photos in such a way that you are in the centre. Then start adding links, explaining who they are and how they’re related to you. Before you know it, you end up with a huge web. Display it at your wedding. People will have a great time trying to figure out where they are. Who knows, you may even find a long lost relative.

6. Create a memory book. When you’ve compiled your guest list, start remembering things about them. Get nostalgic and write down your favourite memories of them. You’ll be astounded by the emotions that come flooding back to you. This is a long process so take your time. You may even want to get together with family and friends to remember “the good ole days.” When you’re done, take your memories and put them in a booklet. Give these out at your wedding and people are sure to have a good laugh, a good cry, and a good time.

Weddings happen every day, but yours only happens once in a lifetime. Make it the most extraordinary day possible. Remember, your love is a personal thing, so make the day when you celebrate it, a personal one.

Monday, July 23, 2007

Think of Your Guests When You Plan Your Wedding

Summer weddings are spectacular, especially when they are held outdoors. You have the beautiful background of fresh green grass, beautiful trees, flowers in bloom, and if you’re lucky, a lake or an ocean. With the summer breeze gently kissing the cheeks of all your guests, nothing could ruin the feeling of romance in the air. The site of your family and friends dancing under the stars in celebration of your love takes your breath away.

I love summer weddings, and I love it even more when the host and hostess of the wedding have taken every detail into consideration for their guests.

I recently attended a wedding held outdoors and was delightfully surprised at the thought and consideration that went into it. The wedding was an outdoor ceremony under a bright blue sky. My husband and I went to take our seats for the ceremony, only to be stopped by bridesmaids and groomsmen offering us a gift from the bride and groom. We were each handed a pair of designer sunglasses. The bridal party explained that it was a gift from the bride and groom so we could enjoy the ceremony without having to deal with the bright glare of the sunlight. I was then offered an old style Asian fan to cool myself if need be. It was delightful.

The party went on late into the night, and as the sun went down, women in their party dresses began to feel the chill of the summer breeze, something that our bride and groom had anticipated. Almost as though on cue, the bridal party made their way around each table offering a pashmina to each female guest.

All the little things that were done over the course of the ceremony and the reception were great. We really felt special and honoured to be sharing this wonderful moment. The bride and groom did a wonderful job of making all their guests feel special. It all added up to a wonderful touch of class.

Saturday, July 14, 2007

Masking With Stamps

This is a great technique to add dimension to your paper crafts without the chaotic look of layering stamp on top of stamp. The technique is called masking, and it’s possible because of a product called masking fluid.

When you begin your project, choose the stamp image that you’d like to appear in the foreground. This is the image that you’d like to appear closest to you. Take that stamp and stamp your image as you normally would.

Then take your masking fluid and apply the fluid directly over top of the entire image. Masking fluid comes in a pen tip applicator allowing you to apply it over fine lines and intricate patterns. Once you have finished, let the masking fluid dry.

Now take another stamp and apply it to your design, overlapping your original image as desired. The portion covered in masking fluid is protected against the ink and will not show. Continue this process until your finished image is complete.

When you’ve completed all your stamping, simply peel off the masking fluid. Use your finger to delicately push off and peel the mask.

Saturday, July 7, 2007

Unique Flower Centerpieces

Setting the stage for your wedding can easily be determined by the décor you choose. Aside from the décor of the building, the most visual aspect you have to work with are your table centerpieces.

Most people choose flowers to decorate their tables, but let’s face it; flowers can be very redundant and can become fairly boring.

To add a twist, here are 5 new ways to recreate your floral centerpieces.

1. Using a tall vase, get some dry bamboo sticks and cut them slightly longer than the length of the vase. Get enough to cover the outside entirely. Glue each stick onto the vase making sure to place them closely together. This will ensure that no spaces are left to peek through. Let the bamboo sticks dry completely and adhere to the vase. Once completed, simply fill the vase with water and flowers.

Note: if you can’t find dry bamboo sticks or want a more budget friendly alternative, you can also use barbeque skewers. These can be purchased at any grocery store, and to add a personal touch, you can also spray paint these to match your colour scheme before gluing.

2. When you think flower centerpieces, people think they should always be housed in a glass vase, especially for weddings. To add a touch of down to earth home sweet home charm, try using terra cotta planter pots. They can really add some style and elegance in an understated way.

3. Choose a glass vase and add jellybeans the same colour as your flower bouquets at the base of the vase. This may sound a little juvenile, but it has a wonderful classy effect.

4. Like our first idea, wrap your vase in something that will enhance the flowers you are trying to showcase. In this case, I suggest using a fabric to compliment your table décor. The fabric should be complimentary to the style of your wedding. For instance, if you’ve showcased your wedding using silk and chiffon, then using a great raw silk fabric to match your colours will add character and style to your décor. If you were having a more casual wedding outdoors, using a heavier woven textured linen fabric would probably work better.

5. Lastly, instead of having a centerpiece, try using flowers blossoms to create a large wreath on your table. After having your place settings set, decorate your table using the inside perimeter of the place settings as your guide. Loosely place flowers evenly all around the table, ensuring that the flowers are mixed well so no colour is more dominant in one spot than another.

Whatever your style, using any of these ideas will definitely make a great statement for your wedding day. Try them out before you decide. You might be pleasantly surprised to see which one works for you.

Sunday, July 1, 2007

Frozen Flower Centerpieces


It’s summer and that means that we’re in wedding season . This means that many brides out there are putting the final touches on their big day. For anyone who is looking for an ingenious idea for centerpieces, try this technique. Freeze some of your favourite flowers in blocks of ice. They’re simple to make and create such a presence. Use vibrant coloured flowers and bright green leaves. You can also uses slices of citrus fruits. Whatever your preference, choose something that will compliment your colour scheme and the season. Use different sizes of ice blocks to create texture and pattern for your table. For a recipe on how to make this, visit www.hallmark.com .

Thursday, June 28, 2007

Top Ten Paper Craft Tools

Have you ever sat down to work on your paper crafts and found yourself in between holding down your paper in the perfect spot and not having your glue anywhere near you? For any crafter it’s important to have your tools ready for work, and readily available.

When I first started creating cards, I wasn’t even aware of half the crafting tools available to me. Some of them are incredibly ingenious and fun to work with, but there are some that have become a staple for my crafting needs. Here is a list of the top 10 paper craft tools you’ll need to make our crafts beautiful.

10. Crafting Tweezers: These are just like regular tweezers, but have a longer handle. Now you may wonder why it is that you need tweezers, but it will become apparently clear when you attempt to handle small items such as beads, or other small embellishments. They are great for positioning items that you may otherwise find difficult to handle with your bare hands.

9. A Crafting Knife: Think of this as a glorified box cutter knife. The main difference is that this tool allows the blade to swivel, allowing you to cut curves. It comes in very handy when you’re cutting shapes by free hand.

8. Cutting Board / Mat: With all the cutting, gluing, and other things you’ll be doing, you’ll need to use a cutting board or mat to protect your work surface. These can come in various sizes depending on your needs. Some of the cool features to look for when purchasing this item are boards that are self-healing. This means that when the board gets cut, it will heal itself so the cut on the board does not become permanent. Another great feature is to have a board with a ruler or grid on it. This can help you with aligning your projects properly.

7. Fine Tip Glue Stick Pen: I know you’re thinking, how important is glue? “Can’t I just get regular all purpose white glue?” The answer is no. If you’re planning on working with paper and using small pieces, using a fine tip glue stick will help keep your project looking neat and clean.

6. Craft Scissors: You need a good pair of sharp scissors that are easy to handle and comfortable to hold. If you’re creating crafts that require cutting, a good pair will go a long way to making your craft projects fun to make. In addition to this, there is a great deal of patterned craft scissors out on the market now, providing decorative cutting patterns. They can add a great deal of personality to any project.

5. Metal Ruler: I prefer a metal ruler to a plastic one for the simple reason that it does not wear away as you cut along it. It also has the added advantage of the ink not wearing away also.

4. Paper Folder: This is absolutely one of my favourite tools for crafting. It’s ingenious because it creates a clean, neat fold that just looks so polished. One of my pet peeves is to receive a great greeting card, but ruined because the fold has broken the paper, or the fold has not been measured out properly.

3. Hole Punch: For whatever reason, I often find that I want to create holes in my paper craft projects. I need them to loop ribbon through, or use for other embellishments. A great paper hole punch is important to have. They come in various sizes so it’s important to have the sizes that meet your needs.

2. Tape: This may not be considered so much a tool as one of the materials that you would use for your crafts, but I’m listing it as a tool because it’s something that just has an enormous and invaluable use. Finding a good tape adhesive that can hold things in place, but can be gently removed, is a great tool.

1. Paper Cutter: Lastly, who would be a true crafter of paper if you didn’t have a paper cutter? This tool is great because it can cut large items if you’d like, and it can cut a larger quantity at the same time. That means it saves you time, and it saves your hands from having to do a lot of hard work.

Now that you know what you’ll need, go out there and start creating!

Monday, June 25, 2007

Paper Folder versus A Bone Folder

One of my greatest passions is creating cards. It allows me to create something that is visually artistic, and also gives me the opportunity to express feelings in the written word. It’s the perfect marriage of the two, culminating in the form of a greeting card.

What I’ve found however is that you can create something beautiful, only to have it ruined by an unprofessional fold. To remedy this, you can use a simple tool called a bone folder. It’s called this for the simple reason that it actually is made of bone.

A bone folder tool can cost anywhere from $5.00 to $15.00 approximately, and of course, if you’re opposed to using something created from bone, they also make plastic and Teflon versions.

The bone folder is essentially used to score your desired paper by running it along a ruler line. You can also just manually use your hands to start your fold by rolling one edge over the other. Using the score line as a guide, you can create a crease and sharpen the fold by using your bone folder to run along the fold. By adding slight pressure, you can create a very professional look. I know this can be difficult to visualize, so the good people at www.artbabe.com have itemized the steps and instructions on how to use a bone folder.

A paper folder is a different tool that can give you the same finished look, but from my experience, is much easier to use. It has a board to work with that has a built in ruler to help guide you. It also has a zero point on the ruler that marks the centre. This allows you to easily determine where the centre of your paper is, which is usually the point at which you normally would fold.

Essentially, there is a metal spike that runs along the board. All you need to do is place your paper over top of your board, using the ruler as your guide. Then you would use the wooden tool that comes with the board. It has a groove where the metal spike fits. When you run it along your paper, you create a perfect fold.

Now the cost of a paper folder is markedly increased from the cost of a bone folder at approximately $90.00. But in my view, it’s worth every penny. When you create cards from scratch, having the ease of the paper folder more than pays for itself. It takes away more of the manual aspect of having to hand fold your paper, and using the bone folder to finish the look.

So the big question is, Paper Folder vs. Bone Folder? Your craft needs will determine your decision. In the meantime, just keep creating your wonderful crafts.

Friday, June 22, 2007

Monogrammed Sugar Cubes

Today every bride and groom would like his or her wedding to stand out. They want to make an impressive statement to their guests, and they want to do it by adding personal touches.

This personal touch is simple, but elegant; having something as ordinary as your sugar cubes personalized with your initials. It’s so unexpected that when your guests reach over to sweeten their coffee, they will be charmed. They’ll appreciate the time and care you took into making this wedding truly yours.

To make, simply purchase boxed sugar cubes from your local grocery store. You can also purchase icing from the grocer in the colours that you want. Make sure it’s the type of icing that hardens when dry. If it’s not, you’ll end up with a pile of sticky sugar cubes that have been stuck together. If you prefer, you can also create your own. Check out, www.cooks.com for some great icing recipes. Then simply use a pastry bag to dispense the icing.

Voila! You’ve just made your sugar cubes a little sweeter.

Thursday, June 21, 2007

Stamp Kissing

As someone who enjoys creating personal cards I find that working with the same stamps can become limiting in the creative process. How many different colours can you stamp something until it just becomes boring?

Well there is a new technique called stamp kissing. It’s ingeniously simple but will definitely add the much needed excitement to your craft projects.

Simply find two stamps: one should be an outline of an object like a heart. Your other stamp should be a pattern, texture, or design. Using 2 different colours, stamp your outline stamp, in this case a heart, into the main ink colour. Set the stamp down with the inked side facing up.

Now take your patterned stamp, and ink it in the other colour you’ve chosen. Take this stamp and place it over top of your original stamp. The two inked sides should be touching. In essence, the stamps are “kissing”.

When you pull them apart, you’ll see that your heart now has a patterned design. Place your stamp on a piece of cardstock and you’ll end up with an intricate designed heart. The heart will be one colour, and the pattern on it will be another.

Wednesday, June 20, 2007

Great Ways To Decorate An Outdoor Wedding Reception

I recently attended a wedding where the ceremony took place in a small one-room church – think Little House on the Prairie – and the reception was held in the backyard of a small farmhouse. A huge white tent was put up, and the natural view of lush greenery, and rolling grassy hills spreading over several acres was quite breathtaking. I had never been to an outdoor wedding before, but what wash ingenious to me was that the reception area was not contained to the tent.

With So much spare space, small and cozy sitting areas were set up around the tent. Some consisted of white washed iron chairs with a small table, elegantly decorated with blushing pink rosebud pillows.

Other spaces had white wicker sofas facing each other to create easy conversational seating.

And other spaces just consisted of lighting. Large candles housed in hurricane vases and tall decorative iron glass encasements lit the grounds beautifully.

Everywhere you looked, people found great places to gather. With the sun shining through the tent walls, children found their gathering place behind the tent creating shadow puppets.

It’s not everyday that you get to attend an outdoor wedding reception; I’d never been to one until recently, and I was pleasantly surprised. With all the charm of the outdoors, how can you resist? That’s the great thing about using nature for your reception venue.

Tuesday, June 19, 2007

How to Make a Simple Money Card Holder for Weddings, Birthdays, Baptisms, and Showers

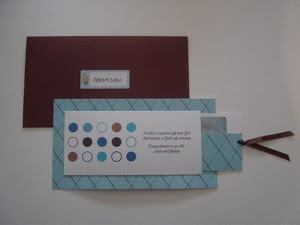
This is a recent card project I made for a christening that I recently attended. The parents are young, hip, stylish, and contemporary. I know this from knowing them, and it was confirmed when I received their invitation. When I originally received it, I knew that I would be creating something that would compliment their style. I also knew that my gift for this occasion would be money, so I designed a card to stylishly hold a monetary gift that would keep it secure. The following is what I created:

To make this card:

1. Choose a colour scheme. Mine was blue accented with a rich chocolate brown, but feel free to be adventurous. Remember, I chose my colour palette to mimic the style of the original invitation.

2. You can use various software programs to do this, but I suggest using Word, as it’s probably the most common to use. Using the Word program, create a pattern of dots. Simply go to your autoshapes and select the circles. Paste them in your word document in a pattern you like. Keep in mind that your margins may need to be altered, as you will need space for edging.

3. Then using your formatting tool: choose your colours and fill the dots.

4. To the right of your polka dot pattern, insert a text box. Type your message, as you’d like it to appear.

5. Print it out on a colour printer using white cardstock.

6. Cut your design making sure you have extra space to fold in the edges, and that it is centered and large enough to hold the size of a dollar bill. The folds should be made slightly larger than the size of the money.

7. Using the left over white cardstock, cut a piece that is slightly smaller than the length of your polka dot paper. The height should be tall enough to slip into the polka dot paper when folded in half. This is your money holder.

8. Using scrapbook paper with a complimentary design, cover the front of the money holder. Cut a little larger on the sides so you can fold over the back. Secure with glue.

9. Hole punch the money holder on the right hand side in the center. Using a coordinating ribbon, loop the ribbon and create a knot to secure it.

10. Take your polka dot paper and center it on your scrapbook paper. Choose the size of your border that you’d like. Cut the scrapbook paper to the size you’ve chosen.

11. If you’d like your scrapbook paper to have more weight, you can glue it onto white cardstock. This is completely up to you. Some scrapbook papers are heavy enough.

12. Take your polka dot paper with edges folded in. Add glue to the folded edge making sure to leave the right hand side open. Apply polka dot paper to scrapbook paper.

13. Insert your money holder into the polka dot paper.

Monday, June 18, 2007

Creative ways to create scrapbook art!

Creating framed artwork can be a daunting task, especially if you’ve never taken a paintbrush to a canvas. But just because you aren’t artistically inclined to paint or sketch, does not mean you lack creativity. If you are a scrap booker, then you know it takes a lot of imagination to create a layout design that coordinates papers, ribbons, other embellishments, and photographs to a colour palette. That in and of itself is a work of art. So my suggestion to you is to consider this; while scrapbooks are a great way to showcase your memories, they are also a great way to add art in a room.

Choose a room in your home that needs a little artwork. Children’s rooms are a great place for scrapbook art. Select a few design layouts from the last birthday party, family vacation, or just of your little tike. This can even be a project that you and your child can do together.

When you’ve made your selection, choose a coordinating matte and frame. The mattes and frames should be identical and should coordinate with all the layouts. This will make the scrapbook layouts really stand out. Cluster the group of frames on the wall, and Voila! You have art.

Thursday, June 14, 2007

Filipino Engagement and Wedding Traditions


ENGAGEMENT: It's been said that when a boy wanted to marry a girl in the Phillipines he would have to begin an engagement process. This process would involve him throwing a spear at the front door of the girl's home. By doing this he was staking his claim on the girl, and essentially publicly announcing that she was no longer available to other suitors. Once done, he would then return to the girl's home with his family to formally request the girl's hand in marriage.

WEDDING: Filipino weddings involve a great number of individuals; normally there is a bride and groom and a wedding party. In the Filipino tradition, there is an extension of the wedding party called Sponsors. Sponsors fall into two categories: The Principal Sponsors, and Secondary Sponsors. Principal Sponsors can be couples, or any individual(s) to which the couple deem important in their lives. Usually aunts, uncles, or other close friends of the family are chosen. The couple can choose as many Principal Sponsors as they wish. The role of the Principal Sponsors is to provide official witness to the marriage, and to provide support, guidance, and wisdom to the couple.

The Secondary Sponsors have a more active role in the wedding ceremony than the Principal Sponsors. The couple chooses 4 sets of Secondary Sponsors: The Coin Sponsors, The Veil Sponsors, The Cord Sponsors, and The Candle Sponsors.

The Candle Sponsors are usually the parents of the bride and groom; it doesn't have to be, but most couples choose thier parents as the symbol that they have been the primary guiding force in thier lives. A candle symbolizing the Light of Christ will be lit by both parents.

The Coin Sponsors are two individuals, or a couple that have been chosen by the bride and groom. They will present the coins (a symbol of prosperity and promise that the groom will provide for his bride and family) to the couple. The coins are called an Arras or Arrhae. During the ceremony 13 coins are presented to the groom. He in turn will hand them to his new bride. It's been said that if he were to drop any of the coins while handing them over, he was breaking his promise to provide for his wife and family.

A gold Arras with a silhouette of two doves meeting in the centre of a heart.  Thirteen coins are attached to the bottom, symbolizing prosperity for the bride and groom.

The Cord Sponsors are again two individuals the couple has chosen. Their role in the ceremony is to place the cord (usually made from coins that have been linked and dipped in gold, forming an eight) over the shoulders of the bride and groom. The figure eight has no beginning and no end; it links both circles together. By placing the cord on the couple, it is a symbol that they have become one through marriage.

The Veil Sponsors like the cord sponsors are responsible for placing a veil over the couple. The veil is white and embodies purity. By placing the veil on the couple, the bride and groom are witness to the presence of God. They are unified under God's presence.

Another important aspect that is unique to Filipino weddings is the attire of the groom and groomsmen. Grooms in the Philippines wear what is called a Barong, and is considered to be formal attire. It is made of a very light weight fabric that is transparent and is embellished by intricate designs. The fabric of the barong is made from pina (fibres woven from pineapple leaves), or jusi (Chinese silk). It is a shirt that is meant to be worn untucked over an undershirt, and worn with black dress pants and shoes.