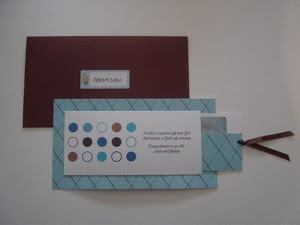
 To make this card:
1. Choose a colour scheme. Mine was blue accented with a rich chocolate brown, but feel free to be adventurous. Remember, I chose my colour palette to mimic the style of the original invitation.
2. You can use various software programs to do this, but I suggest using Word, as it’s probably the most common to use. Using the Word program, create a pattern of dots. Simply go to your autoshapes and select the circles. Paste them in your word document in a pattern you like. Keep in mind that your margins may need to be altered, as you will need space for edging.
3. Then using your formatting tool: choose your colours and fill the dots.
4. To the right of your polka dot pattern, insert a text box. Type your message, as you’d like it to appear.
5. Print it out on a colour printer using white cardstock.
6. Cut your design making sure you have extra space to fold in the edges, and that it is centered and large enough to hold the size of a dollar bill. The folds should be made slightly larger than the size of the money.
7. Using the left over white cardstock, cut a piece that is slightly smaller than the length of your polka dot paper. The height should be tall enough to slip into the polka dot paper when folded in half. This is your money holder.
8. Using scrapbook paper with a complimentary design, cover the front of the money holder. Cut a little larger on the sides so you can fold over the back. Secure with glue.
9. Hole punch the money holder on the right hand side in the center. Using a coordinating ribbon, loop the ribbon and create a knot to secure it.
10. Take your polka dot paper and center it on your scrapbook paper. Choose the size of your border that you’d like. Cut the scrapbook paper to the size you’ve chosen.
11. If you’d like your scrapbook paper to have more weight, you can glue it onto white cardstock. This is completely up to you. Some scrapbook papers are heavy enough.
12. Take your polka dot paper with edges folded in. Add glue to the folded edge making sure to leave the right hand side open. Apply polka dot paper to scrapbook paper.
13. Insert your money holder into the polka dot paper.
No comments:
Post a Comment